Categories
Geek Speak

WordPress

Just spent a few days getting intimate with a wayward WordPress 6 on PHP 8 implementation. The site was failing to load after an AWS rebuild.

The short version is after trying to delete all of the plugins and reload the theme, one plugin had to be deleted at the command line.

Problem fixed.

To get the obstinate plugin to plug in, I had to delete all references to it from the options table and delete all references to actionscheduler.

The second issue was the wp_lostpassword_url() function refused to run. I ended up mimicking its behavior inline —

add_query_arg( array(‘action’ => ‘lostpassword’,), network_site_url( ‘wp-login.php’, ‘login’ ) ); 

Ugly but, functioning.

Categories
Geek Speak

Out with the Old

As someone who often interviews ‘Software Engineers’, I am in capable of suffering one more conversation where I am told that my existing code base is garbage and needs to be completely rewritten. Recently, I paid for a port from php to node.js, only to be told that the new node code is awful by someone trying to win updates and ongoing maintenance. I have read the code. Other than a complete lack of any comments, it is quite legible and supportable.

It is possible to market software engineering services without degrading all others in the field or over inflating the work estimate. It is possible to win a contract by admitting it will take some additional time and effort to become fluent with someone else’s earnest work product.

Categories
Geek Speak

Spam

I actually like spam. It makes a good sandwich in a pinch or on a camping trip.

I’m not so big on spam comments on my blog. I just cleared 313 comments. 312 were clearly spam from essentially one source. The 313th one was spam but from another source.

I’ve made it harder to leave a comment now, sorry.

Between the bs comments and the incessant hack attempts looking for files THAT AREN’T THERE. I’m not sure I have any real traffic.

I’m thinking about installing WordFence and blocking whole segments of the Internet.

Categories
Geek Speak

Putty Party

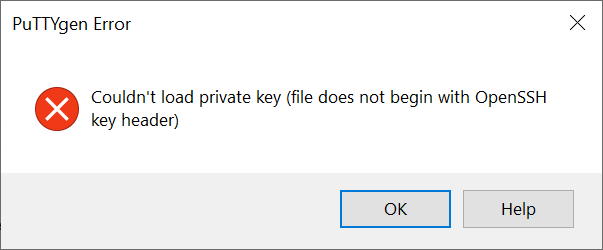
So you want to ssh somewhere from a Windows machine. The first step is to install putty. But, no you can’t ssh because putty won’t use the pem file you’ve been given by some geek, nerd, gnome. A little Googling and now it’s time for puttygen. Following the directions, load plus all files plus pick your pem and error message!

This message has nothing to do with the key header and most likely is whitespace at the end of lines caused by Windows-to-Linux-to-MacOS-to-WhoKnowsWhat. Just open the pem in Notepad and make sure there is nothing at the end of the lines. Once you have deleted all of the invisible stuff, try the load again. Also remember to actually save the new ppk format cert with a ppk extension or you’ll be in putty-hell a bit longer trying to find a cert that is not there (C:\Users\your-account-here\Documents\auth\your-cert.ppk).
Categories
Geek Speak

HTTP2 Bad Header Fix for Elastic Beanstalk

Had issues with Safari not loading WordPress sites running on AWS Elastic Beanstalk. Looked for solutions, everything pointed to setting H2Upgrade off in an httpd config file. I tried seven different combinations before I came up with this fix –

  1. Use .platform/hooks/postdeploy to run a script that builds a config file in /etc/httpd/conf.d during deployment
  2. Use another file in the same folder, named to run later, to restart https

File 1 – .platform/hooks/postdeploy/02_httpd_config.sh

#!/usr/bin/env bash
echo “02_httpd_conf.sh running”
target=/etc/httpd/conf.d/safari.conf
target_d=/etc/httpd/conf.d
if [ ! -d $target_d ]; then
    echo “$target_d does not exist”
else
    echo “$target_d exists”
fi
if [ ! -f $target ]; then
    echo “$target does not exist”
    sudo sh -c “cat > $target” <<EOT
        H2Upgrade off
        Header unset Upgrade
EOT
    sudo chown $target
    sudo chmod -x $target
    sudo ls -al $target_d
else
    echo “$target exists”
fi
echo “02_httpd_conf.sh complete”

REMEMBER –
1. Format, indentation is very important in these files.
2. chmod +x .platform/hooks/postdeploy/02_httpd_config.sh or it will not run

File 2 – .platform/hooks/postdeploy/99-httpd_restart.sh

#!/usr/bin/env bash
    sudo systemctl restart httpd

REMEMBER –
1. chmod +x .platform/hooks/postdeploy/02_httpd_config.sh or it will not run

2. If you copy this files, beware of “smart quotes”

Beyond looking at the site with Safari, if you use curl -v https://yournamehere.com, you will see

http2 error: Invalid HTTP header field was received: frame type: 1, stream: 1, name: [upgrade], value: [h2,h2c]

After the fix, curl returns html.

In the first file, the unset directive worked, H2Upgrade off did not. I left it in to remind me of what a pain it was to track this down and fix.
Categories
Geek Speak

Adding a Load Balancer to an Existing AWS EC2 Instance

Just lost two days of my life fighting this. I had an instance that I wanted to add HTTPS to. Created a load balancer, added the https listener, added a target group, added the instance to the target group. Created the whole thing. Added the new load balancer security group to the old instance group’s inbound list with port 80. Got HTTP 503 back.

Ran around in circles playing with security groups.

Finally looked at the target group. The instance was not there. Added it. Everything worked.

The hint was in the AWS docs if you get to the right place. It would be great if it were possible to search for AWS issues and be able to read something other than AWS docs.

Categories
Geek Speak

WordPress / Elastic Beanstalk

The advantages are worth the effort – auto-scaling, minor updates, weekly restarts. The following is my build list —

  1. Create an EFS file system to hold uploads that persists through platform updates and are accessible on multiple environments.
  2. Add the default security policy for the default VPN to the EFS security group. This will save a lot of aggravation later.
  3. Create an RDS database to hold the data that persists through platform updates and is accessible on multiple environments.
    1. Don’t let Elastic Beanstalk build the database for you. It will automatically terminate it if you terminate the environment it was built by.
    2. Don’t be bullied into a large instance if you don’t need one. If you click enough you’ll find low-cost db instance sizes.
    3. Don’t implement multi-availability zones unless you are really ready.
  4. Create a CodeCommit repository to hold your configuration files and WordPress.
  5. Clone the repository to local working directory. This is a good time to work out all of the AWS CLI config and credentials monkey business.
  6. Create an Elastic Beanstalk application and environment
    1. Use the default VPN. Do not put it in a new VPN it will make things 10x harder.
    2. Make it autoscaling even if you set the min and max count to one. This will attach a load balancer to terminate HTTPS.
    3. Add the HTTPS listener on the load balancer before creating so that all of the HTTPS fun is baked in. Use an AWS domain wide certificate. There is no reason not to, they are free.
    4. Make sure to put the instance in the RDS security group. It will just make everything easier later when WordPress is trying to initialize. If your security environment is complicated, Elastic Beanstalk will croak here. There is a stupid 200 character limit on the security group list. This is especially egregious with the ‘new’ long names for resources.
    5. Attach you environment to all of the IP subnets that you can in your availability zone. There does not seem to be any downside to doing this.
    6. I used to say add in all of your environment properties here BUT, with Amazon Linux 2 environment properties are only available to root accounts. So, they are pretty much useless now.
    7. Create the environment.
  7. Once it is built navigate to the public DNS location and see the default ‘success’ page.
  8. Add a Route 53 DNS entry in you hosted zone that matches the certificate. This will make the WordPress configuration easier.
  9. Test out your new URL. Make sure the HTTPS is working without silly ‘unsafe’ warnings.
  10. Before you do anything else get the eb cli configured and attached to your repo, app, and environment.
  11. Extend the Elastic Beanstalk configuration with the WordPress necessities —
    1. Create a .ebextensions/options.config file to hold all of the database information and salts.
    2. Create an efs-mount.config file. The contents can be copied from AWS help on the topic — EFS mount Elastic Beanstalk. Make sure to put the correct EFS id and region.
    3. If you want a warning-free WordPress build, add a packages.config to force imagick on to the environment
      packages:
      yum:
      amazon-efs-utils: []
      ImageMagick: []
      ImageMagick-devel: []
      ImageMagick-perl: []
      commands:
      01_install_imagick:
      command: /usr/bin/yes ”| sudo /usr/bin/pecl install imagick
      test: ‘! /usr/bin/pecl info imagick’
    4. Now here’s the tricky part. Amazon Linux 2 on Elastic Beanstalk really does not want to support .htaccess files. The best workaround is to implement a wordpress.config file to place a file at /etc/httpd/conf.d/wordpress.conf. Place the directory rewrite instructions here so that WordPress can do the URL voodoo that it does.
      files:
      “/etc/httpd/conf.d/wordpress.conf”
      mode: “000744”
      owner: root
      group: root
      content: |
      <Directory “/var/www/html”
      Options FollowSymLinks
      AllowOverride All
      Require all granted
      RewriteEngine On
      RewriteBase /
      RewriteRule ^index.php$ – [L]
      RewriteCond %{REQUEST_FILENAME} !-f
      RewriteCond %{REQUEST_FILENAME} !-d
      RewriteRule . /index.php [L]
      </Directory>
    5. Now it is time to get a symlink configured to the EFS mount point. My EFS mounts to /wpfiles. The link has to be created AFTER the application is copied into /var/app/current. To make this happen create a file in .platform/hooks/postdeploy/01-symlink.sh. This is really a one-liner, mine looks like
      #!/usr/bin/env bash
      sudo -u webapp ln -s ${EFS_MOUNT_DIR} ${EFS_LINK_DIR}
    6. Check all of the ownership and permissions on the files you just created. Remember shell files have to be executable.
    7. Download WordPress and put it in the root of you repo.
    8. Do a little git magic – git add –all; git commit -am “initial build”; git push
    9. Deploy it all up to Elastic Beanstalk – eb deploy
    10. Try to navigate to your URL. If you did everything right it should tell you to configure WordPress.
    11. Once you are configured, have you theme picked out, have loaded your plugins, and cleaned up any lint, bring a copy back to your local repo, commit it and deploy it back up. This will serve as your application going forward.

I wrote a script to do that last step. I run it every time there is a WordPress, theme or plugin update.

Categories
Geek Speak

AWS Elastic Beanstalk 2

AWS Amazon Linux 2 environment properties are only accessible to root accounts. So, now to pass environment variables to wabapp, for example, I created a .ebextensions/options.config file that looks like this —

option_settings:
aws:elasticbeanstalk:application:environment:
A_KEY: 10GceMTd5\ShfUL2R+MGxJgErcwGfwgm2==tCy_Z
A_SALT: s/yIV2Qv=uW1efams5Iy+Lg1u7JXD-WLA:Zp6Y2eY

I truncated the 64-character, random string, values above so that they appear on the same line as the key.

Categories
Geek Speak

AWS Elastic Beanstalk

I learned something interesting yesterday trying to create an updated an Elastic Beanstalk environment.

ENVIRONMENT PROPERTIES CAN ONLY CONTAIN –

[A-Z_][A-Z0-9_] _ . : / = + \ – @ ‘ ” Single and double quotation marks in values must be escaped. (=DON’T USE.)

EB Environment, Configuration, Server will except accept illegal characters.

The script that exports the properties to env variables will fail silently, yielding no values in printenv versus eb printenv.

Sixteen hours later. The AWS documentation is right, the configuration page needs a little UI work.

Here is my solution to the problem –

!/bin/bash

#AWS Compatible Salt Shaker

#use awscss.sh number_of_strings length_of_strings

if [ $# -lt 2 ]; then
echo “Use – awscss.sh number_of_strings length_of_strings”
echo “For wordpress use – awscss.sh 8 64”
exit
fi

allowableCharacters=’abcdefghijklmnopqrstuvwxyzABCDEFGHIJKLMNOPQRSTUVWXYZ1234567890_.:/=+-@’

#loop through the number of random strings to generate

for ((i=1; i<=$1; i++))
do
randomString=()
# loop through the length of the random string
for ((j=1; j<=$2; j++ ))
do
randomNumber=$((0 + RANDOM % 71))
# do something ${string:position:length}
randomString+=${allowableCharacters:$randomNumber:1}
done
echo $i ${randomString[@]}
done

Categories
Geek Speak

Updating WordPress on AWS Elastic Beanstalk

If you have gone through the bother of building WordPress on AWS Elastic Beanstalk and EFS, you probably are not looking forward to the next WordPress update. The simple answer is to do things backwards. Update your server then use the update to update your repo then use your updated repo to update your server. Simple

  1. Login to the wp-admin page for your site
  2. Update WordPress
  3. Update Your Plugins
  4. Update Your Theme
  5. Clean Up Any Lint in Your WordPress
  6. Make a tar of your WordPress directory
  7. scp the tar to Your Workstation
  8. Uncompress it to a temporary directory
  9. Delete All of the Files in Your Update from Your CodeCommit Repo
  10. Copy Everything in Your Update to Your Repo
  11. git add –all
  12. git commit -am “wordpress update”
  13. git push
  14. eb deploy

I wrote a script to do this and put it in the repo so I would always have it. My script looks like this:

# !/bin/bash
# this file is present in the local document root, it must be run from that location
# get the server name from AWS
myserver=$(aws ec2 describe-instances –region us-east-1 –profile MYPROFILE | grep -m 1 PublicDns | awk ‘{print $2}’ | sed -e ‘s/\”//g’ -e’s/\,//’)

# run a command on the server to bundle up the Elastic Beanstalk document root
ssh -i ~/.ssh/MYCERT.pem ec2-user@$myserver -t ‘tar -czvf ~/wp-new.tar.gz -C /var/app/current/ .’

# copy the bundle from the server to the local workstation
scp -i ~/.ssh/MYCERT.pem ec2-user@$myserver:wp-new.tar.gz ~/Downloads

# decompress the image in the Downloads directory
mkdir ~/Downloads/wp-new
tar -C ~/Downloads/wp-new -xvzf ~/Downloads/wp-new.tar.gz

# delete all of the files found in the extract from the local repository
ls -1 ~/Downloads/wp-new | xargs /bin/rm -rf

# copy the server document root into the local repository
cp -R ~/Downloads/wp-new/ .

# remove the upload directory to keep the deploy from failing
rm -f wp-content/update

# the following lines are only needed for Code Commit implementations
ts=/bin/date +%Y%m%d%H%M
git add –all
git commit -am “wordpress update $ts”

#clean up
rm -rf ~/Downloads/wp-new
rm -f ~/Downloads/wp-new.tar.gz

# the following line pushes the update to the elastic beanstalk instance
eb deploy